

How to Prioritize WiFi Networks on Mac and iPhone
WiFi is pretty much the about sought afterward article these days, especially if you lot tin bag it for gratuitous. It's everywhere in today's world, with nigh places having more than i WiFi network available. That'due south all swell for connectivity, only it does play the role of a double-edged sword. Y'all meet, having multiple WiFi networks also poses the question of which i you should connect to, since one might have better coverage in i surface area and weak in the other. At my house, for instance, I have a divide network for the upper and lower floors, and I'd ideally want to connect to the network that's for the floor that I'm on, since the point strength is understandably amend.
About of today's operating systems — especially macOS and iOS — are quite intelligent, merely not enough to differentiate and switch between WiFi networks past decent vs. good signal forcefulness. That ultimately leads to situations where you volition end up connected to a WiFi network that has a fair bespeak force despite the fact that you accept an splendid alternative network available, leading to a poor connectivity experience. Luckily, at that place's a way around that on Mac and iPhone/iPad.
Prioritizing WiFi networks in macOS
One of the many things about macOS that I love, is how information technology offers a pleasant user experience, and puts user friendliness ahead of everything else (and aye, you tin can disagree with that; it is just my stance formed over years). A feature in macOS Sierra and before, which is often either overlooked or ignored, is the ability to prioritize saved networks by the gild that you want your Mac to connect to them. Using this, you can actually define which networks have college priority, so that in their presence, your Mac will connect to them first and even switch to them if they go available.
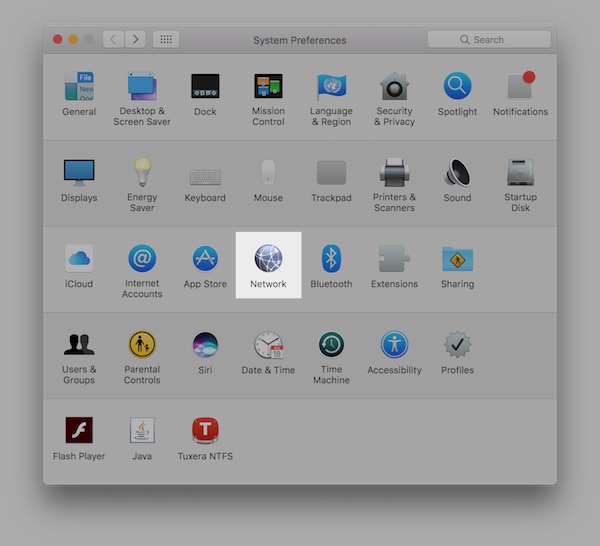
i. Accessing this feature is pretty easy. Either click the WiFi icon in your Mac's menu bar and navigate to "Open Network Preferences" or launch the Settings app and get to Network preference pane.
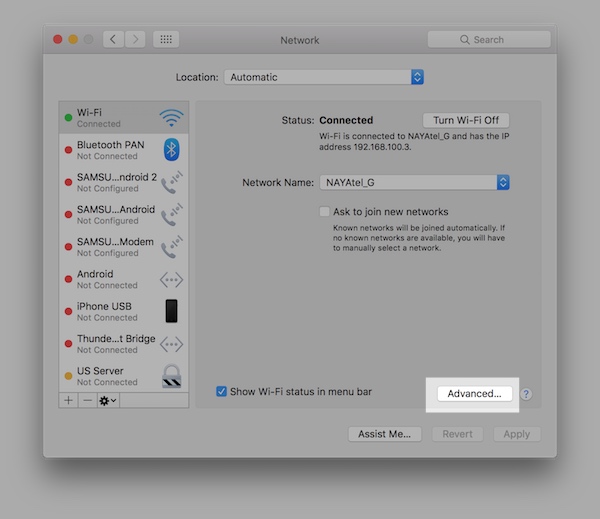
2. From the pane, make sure that WiFi is selected in the left sidebar. Then, from the right side, click the "Advanced" button towards the bottom.
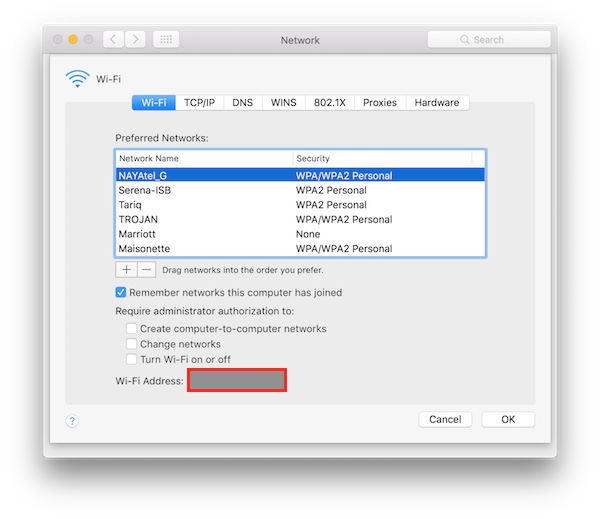
3. The next window will present a column nether the title "Preferred Networks", where all the remembered WiFi networks on your Mac will be listed. Only underneath this column, you'll encounter a plus and a minus button. These buttons will move a selected network up or downward the list, respectively.
Here's the matter: networks on the top of the list have a higher priority compared to the ones at lesser. Therefore, all you need to do is to arrange the networks in the order that you want to connect to them. This means that whichever network you want to always stay connected to, just select it and use the plus sign to motion it to the very top of the list. Besides, if yous want to lower the preference for a network, simply motion information technology toward the finish of your list.
Once done, click OK and your Mac will remember these preferences for the time to come, resulting in a smooth WiFi connectivity feel.
Prioritizing WiFi networks in iOS
While in that location's a straightforward way to prioritize WiFi networks in macOS, iOS 10 or any previous version doesn't offer any such option. The truth is that this is a larger problem particularly on iPhones and iPads rather than Macs, yet Apple tree doesn't seem to accept addressed this notwithstanding. Nevertheless, this doesn't mean it can't still exist done.
Note : You will need a Mac with the same Apple tree ID being used on both the computer and the iPhone.
There isn't any specific action that you need to accept to achieve network prioritization on an iPhone or iPad. Because settings and preferences are shared across Apple devices,provided they're using the same Apple ID, whatever priority you define on the Mac will carry over to the iPhone assuming that iCloud sync is enabled.
Thus, to brand your iPhone connect to a preferred network, mark it as the preferred network on your Mac using the steps outlined in a higher place, and you'll be all set on your iDevice as well.
Of course, there are sure caveats to this process. It requires you to accept a Mac with the same Apple ID shared across both. It likewise assumes that you lot have the same WiFi networks configured on both your iPhone and Mac, which is very likely not the case since the iPhone is a lot more than mobile than a Mac potentially may be. Notwithstanding, this is the only mode, every bit of now.
Meet ALSO: How to View Saved iPhone WiFi Passwords on Mac (No Jailbreak)
Set up WiFi Priority on iPhone, iPad and Mac
Well, those were the steps to set upwards WiFi network's priority on an iPhone, iPad or Mac. While it'southward pretty straightforward on a Mac, it's irritating and disappointing that Apple hasn't addressed something every bit basic equally this in iOS, especially since iOS prides itself in its user-friendliness, but until Apple tree does something about it, this your workaround to your WiFi bespeak strength concerns. If you have whatever other manner to prioritize WiFi networks on Apple tree devices, do let us know in the comments section below.

Source: https://beebom.com/how-to-prioritize-wifi-networks-mac-iphone/
Posted by: williamssuest1997.blogspot.com
0 Response to "How to Prioritize WiFi Networks on Mac and iPhone"
Post a Comment